Let’s be honest—learning how to tie a tie properly can feel like a lost art in today’s world of casual wear and zip-up fashion. But mastering this classic skill is one of the easiest ways to stand out and instantly upgrade your look. Whether you’re suiting up for a wedding, preparing for your first big job interview, or just want to sharpen your everyday style, knowing how to tie different types of necktie knots is a game-changer.
And here’s the best part: you’re not stuck with just one boring knot.
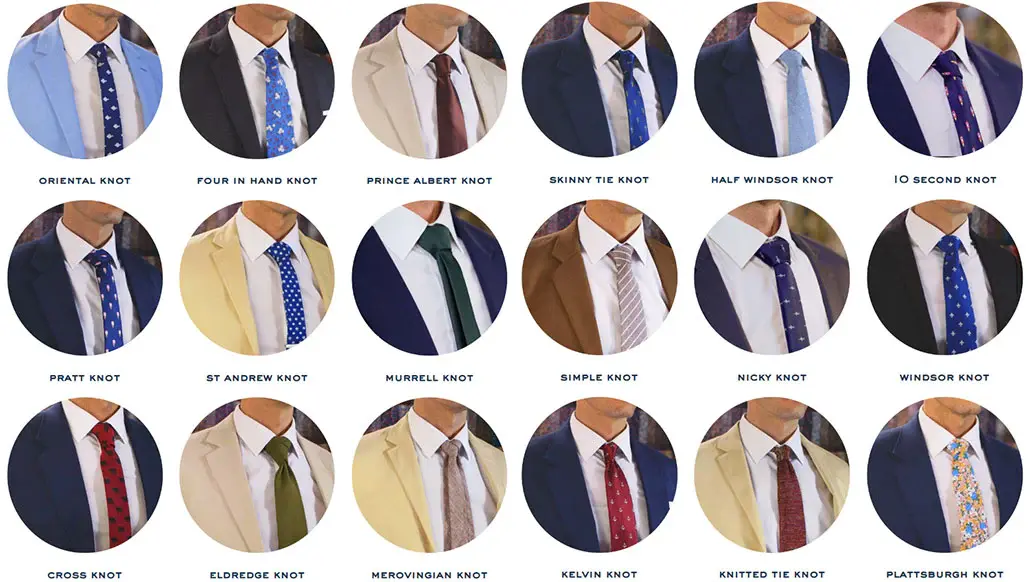
In this ultimate style guide, we’re going beyond the basic four-in-hand. You’ll discover 15 different tie knots for men, ranging from easy and classic to bold and intricate. Whether you need a simple necktie knot for beginners or you’re ready to impress with a complex knot for formal events, this step-by-step breakdown has you covered.
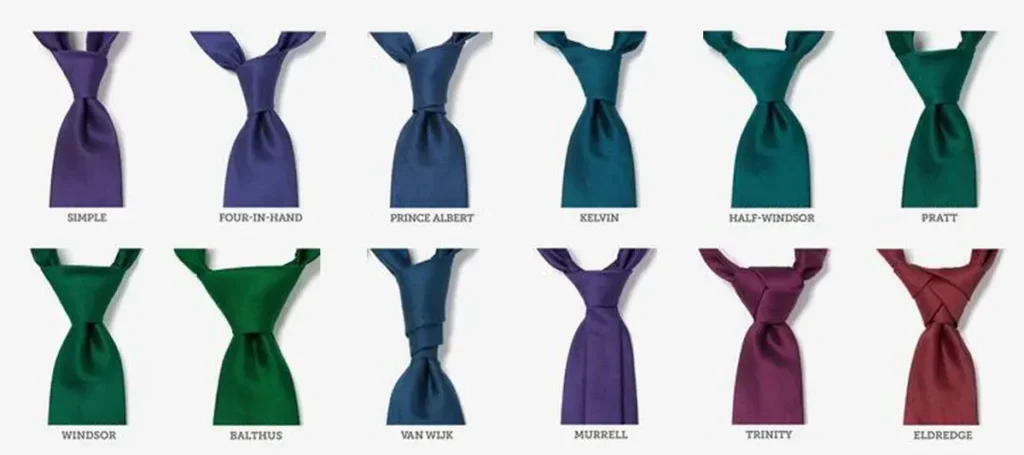
From timeless styles like the Windsor knot for business attire to showstoppers like the Eldredge or Trinity knots for weddings and fashion-forward events, each knot in this list tells a different story—and adds a new level of personality to your outfit.
Ready to turn a simple necktie into your signature statement piece?
Let’s dive into the 15 best necktie knots every modern gentleman (or anyone rocking a tie) should know—complete with tips, techniques, and which knot works best for every occasion.
1. How to Tie the Four-in-Hand Knot – A Simple Tie Knot for Beginners
The Four-in-Hand knot is the most popular and beginner-friendly tie knot in the world. It’s easy to learn, quick to tie, and perfect for both formal and casual settings.
Step-by-Step Instructions:
- Drape the tie around your neck, with the wide end on your right and the narrow end on your left.
- Cross the wide end over the narrow end.
- Bring the wide end behind the narrow end, then over again.
- Bring it up through the neck loop from underneath.
- Tuck it down through the front loop you’ve created.
- Tighten and adjust.
This is the go-to knot for daily business attire, school uniforms, or anyone who wants a simple tie knot for work without fuss.

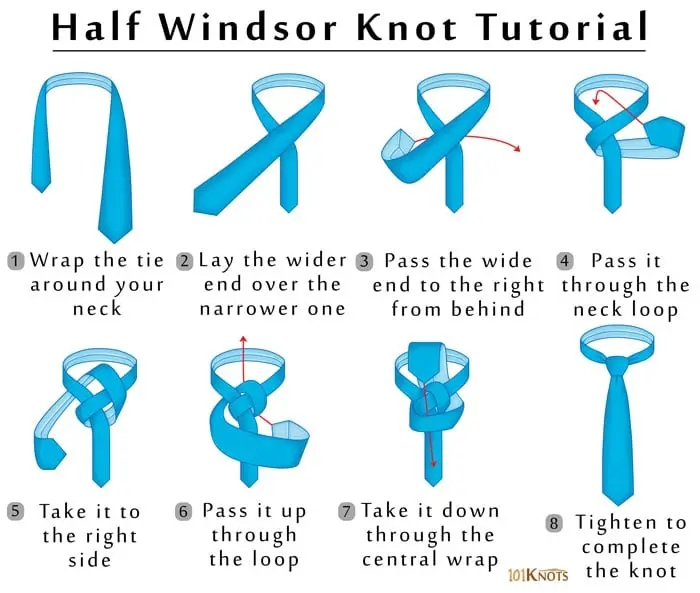
2. How to Tie the Half Windsor Knot – A Balanced Knot for Business
The Half Windsor is a step up in formality and symmetry. It creates a medium-sized, triangular knot that works best with dress shirts with a medium spread collar.
How to Tie It:
- Start with the wide end on your right, extending about a foot below the narrow end.
- Cross the wide end over the narrow and bring it up into the neck loop.
- Bring it down to the left.
- Wrap it around the front from left to right.
- Bring it up again through the neck loop.
- Tuck it into the front knot and tighten gently.
Ideal for business meetings, office settings, and job interviews, the Half Windsor is a great blend of style and professionalism.
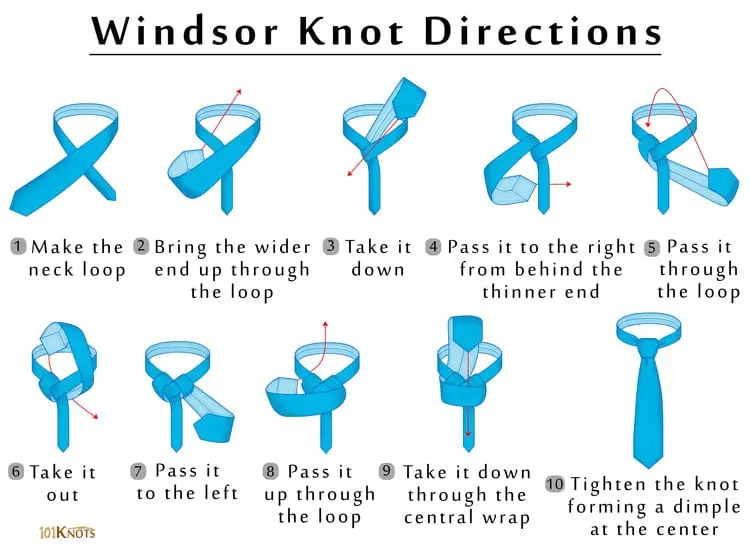
3. How to Tie the Full Windsor Knot – A Wide Knot for Formal Occasions
The Full Windsor knot (also known as the Double Windsor) is larger, more symmetrical, and perfect for wide-collar dress shirts and formal occasions where you need to look sharp.
How to Tie a Full Windsor Knot:
- Place the tie around your neck with the wide end on the right.
- Cross the wide end over the narrow end and bring it up through the neck loop.
- Pull it down to the left.
- Now go behind the knot and bring the wide end up again—this time through the other side of the neck loop.
- Wrap the wide end across the front.
- Bring it up through the loop one final time and slide it into the knot.
- Tighten and shape it.
This is the ultimate tie knot for weddings, formal events, and boardroom meetings, delivering a powerful and polished look.
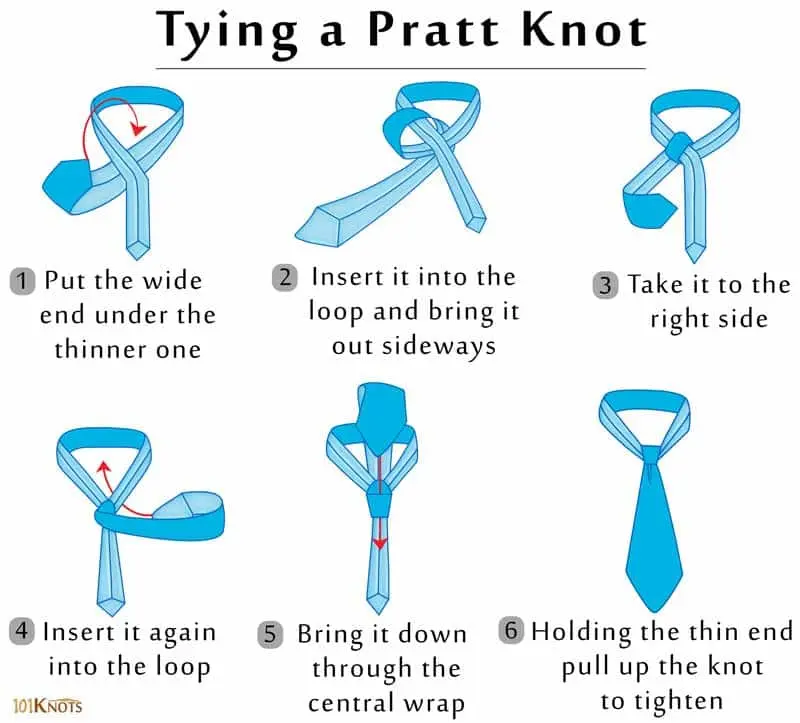
4. How to Tie the Pratt Knot – A Neat Tie Knot for Semi-Formal Style
The Pratt knot (also known as the Shelby knot) is less well-known but highly versatile. It sits between the Four-in-Hand and the Windsor in size, creating a clean, symmetrical look.
How to Tie the Pratt Knot:
- Start with the tie inside out (seam facing outward) and the wide end on your right.
- Cross the wide end under the narrow end.
- Bring it up through the neck loop and down.
- Cross it over the front, then bring it up through the loop again.
- Slide it down into the front knot and adjust.
A perfect choice for semi-formal occasions, presentations, or date nights.
5. How to Tie the Oriental Knot – Easiest Tie Knot for Slim Ties
The Oriental knot (also called the Simple knot) is the fastest and smallest tie knot you can learn. It’s especially useful when wearing slim ties with narrow collars.
Step-by-Step:
- Start with the tie inside out, wide end on the right.
- Cross the wide end under the narrow end.
- Bring it over and through the neck loop from underneath.
- Pull it down into the front loop and tighten.
This is a great tie knot for short ties, minimalist outfits, or when you’re in a rush but still want to look sharp.

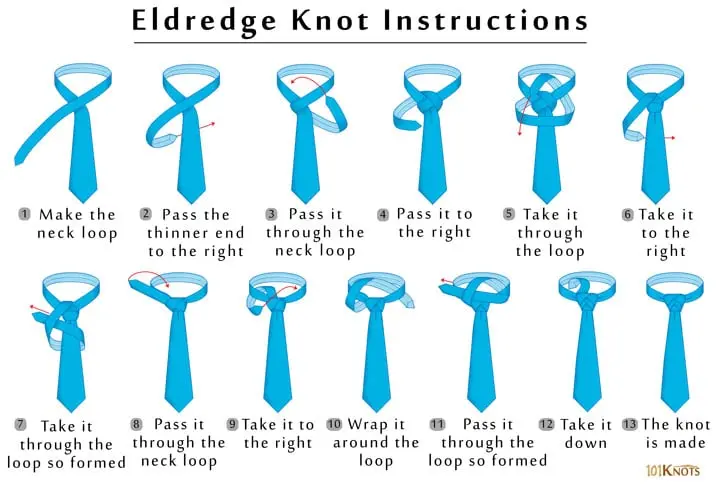
6. How to Tie the Eldredge Knot – A Complex Knot for Stylish Men
The Eldredge knot is a bold, intricate design that uses multiple smaller folds to create a layered, braided look. This is not your average knot—it’s a statement piece best suited for fashion-forward events, weddings, or special occasions.
How to Tie It:
- Start with the narrow end as the working end.
- Cross the narrow end over the wide end and pull it up through the neck loop.
- Wrap it behind the wide end and up through the loop again.
- Continue wrapping and tucking the narrow end, creating visible folds.
- After about 4–5 layers, tuck the remaining end behind the collar or inside the shirt.
Pro tip: This knot looks best with solid or lightly textured ties to show off the design. Perfect for grooms, creative professionals, or any man who wants his tie to be a conversation starter.
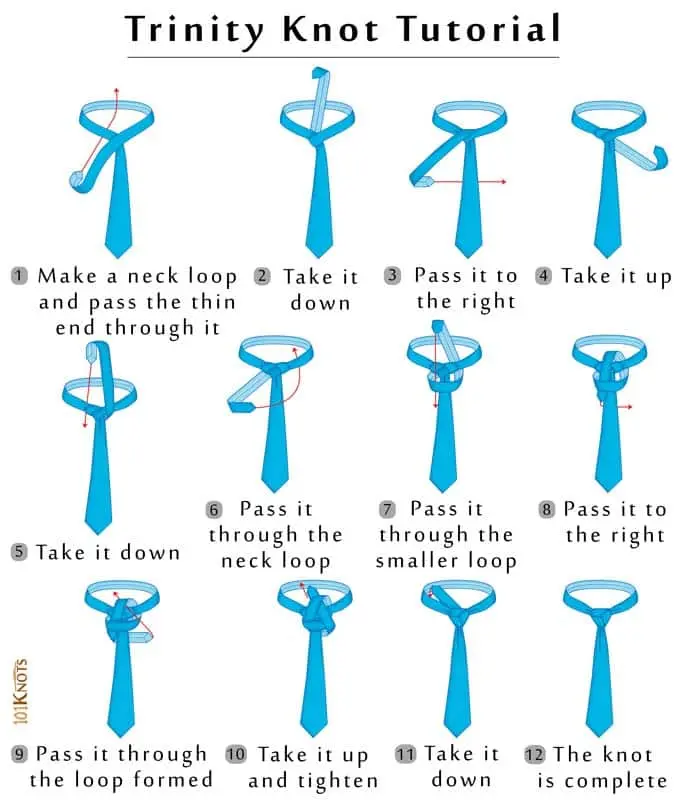
7. How to Tie the Trinity Knot – A Bold Knot for Special Occasions
The Trinity knot is another visually striking knot that forms a three-way triangular shape, resembling a Celtic trinity symbol. It’s elegant, symmetrical, and ideal for formal evening wear or modern wedding attire.
How to Tie the Trinity Knot:
- Use the narrow end as the active end, just like the Eldredge.
- Wrap it over the wide end and up through the neck loop.
- Repeat in various directions, creating overlapping loops that form the trinity shape.
- Tuck the end behind the folds once complete.
Wear the Trinity with a monochrome or subtly patterned tie. It looks best when the knot is the center of attention, so keep the rest of the outfit simple.
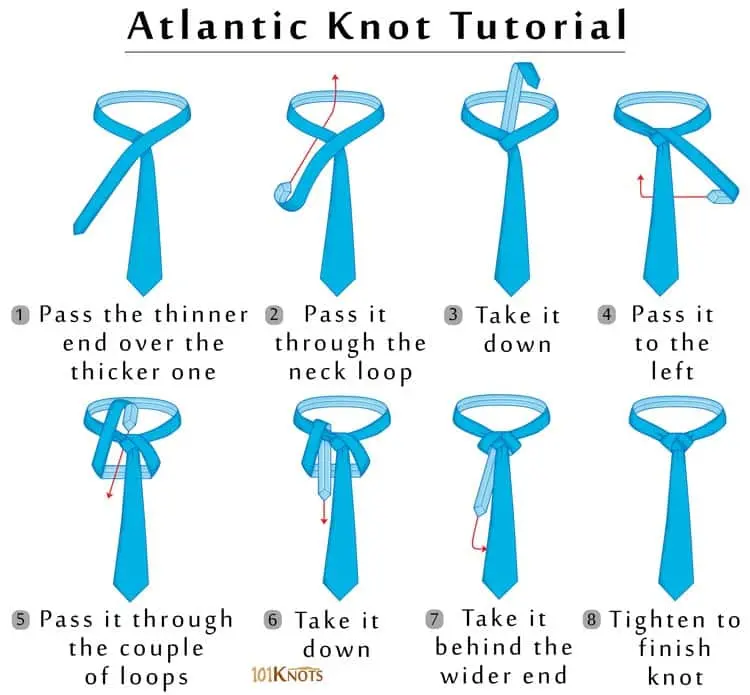
8. How to Tie the Atlantic Knot – An Eye-Catching Asymmetrical Tie Knot
The Atlantic knot is all about asymmetry and flow. It’s off-center, and artistic, and works best with bold prints or skinny ties. A great option for fashion events, parties, or creative photoshoots.
How to Tie It:
- Begin with the narrow end active, wide end hanging to mid-chest.
- Cross and loop the narrow end over multiple times, allowing the knot to shift slightly to one side.
- Keep folds loose and natural for that effortless, draped look.
- Tuck and adjust the shape.
Best paired with modern, fitted shirts and a touch of attitude.
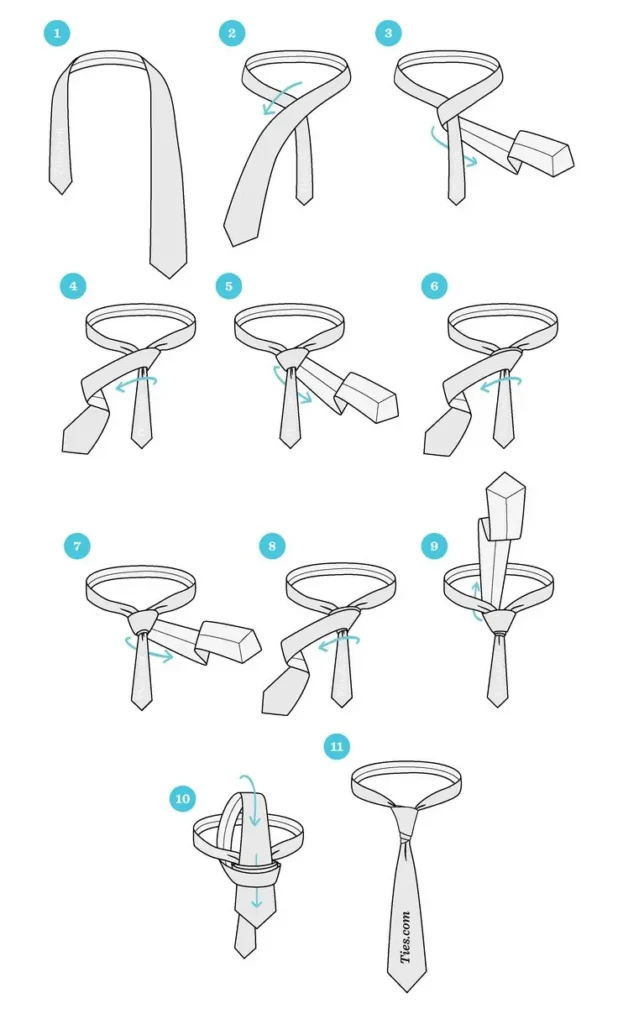
9. How to Tie the Van Wijk Knot – Tall Knot for Long, Slim Neckties
The Van Wijk knot is a tall, cylindrical knot created by stacking multiple wraps. It’s sleek and modern and works best with long, slim neckties and narrow shirt collars.
Step-by-Step:
- Use the wide end as the active end.
- Wrap it around the narrow end 3 times, each layer slightly higher.
- Bring it up through the neck loop and tuck it through all the wraps.
- Tighten and align the layers vertically.
This is a favorite among minimalist dressers who still want to express creativity.
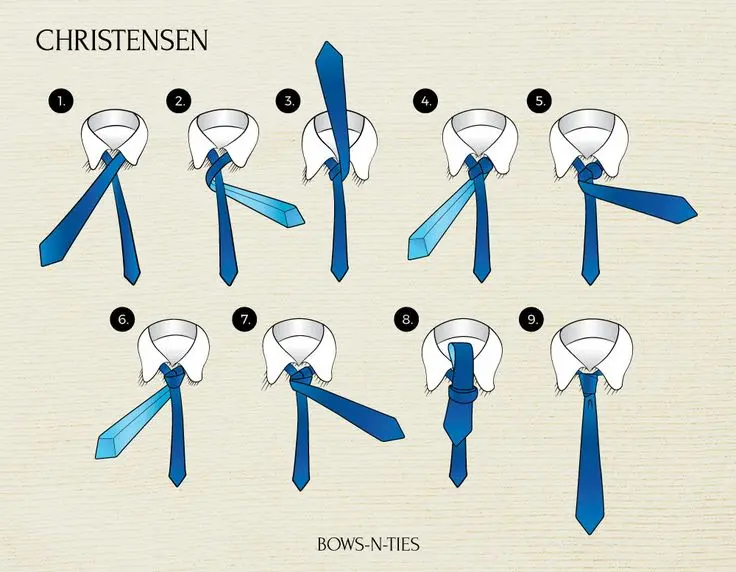
10. How to Tie the Christensen Knot (Cross Knot) – A Refined Knot for Formalwear
The Christensen knot, also known as the Cross knot, creates an elegant, X-shaped cross at the center of the tie. It’s perfect for formal events, business presentations, or even as a refined tie knot for church or ceremonies.
How to Tie It:
- Start with the wide end as usual.
- Form an “X” shape across the front by looping the wide end diagonally.
- Pass it through the neck loop and back down the center.
- Adjust the cross for a symmetrical, sharp finish.
It looks best with high-quality silk ties and classic suits, where subtlety meets detail.
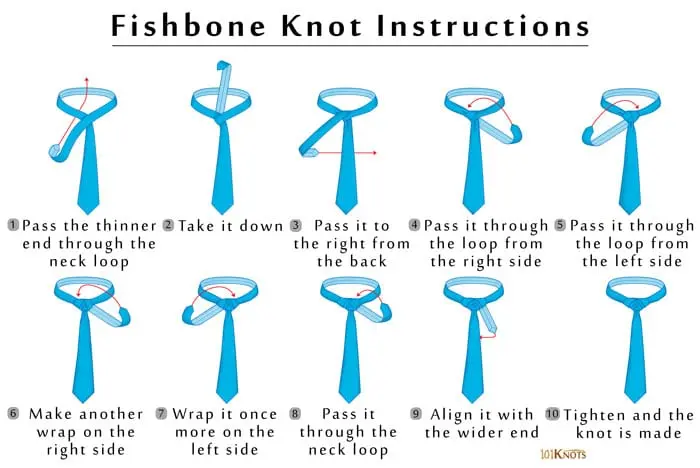
11. How to Tie the Fishbone Knot – A Braided Tie Knot for Stylish Men
The Fishbone knot is one of the most detailed and artistic tie knots, mimicking the structure of a fishtail braid. It’s perfect for fashion-forward events, creative gatherings, or themed parties.
How to Tie the Fishbone Knot:
- Use the narrow end as the active end.
- Begin wrapping it over and under the wide end in alternating directions.
- Each wrap should layer just above the previous one, creating a “fishbone” look.
- After 6–7 layers, tuck the narrow end behind the knot.
This knot works best with solid-colored ties to show off its texture. It’s a fantastic choice for stylish men’s fashion and photoshoots.
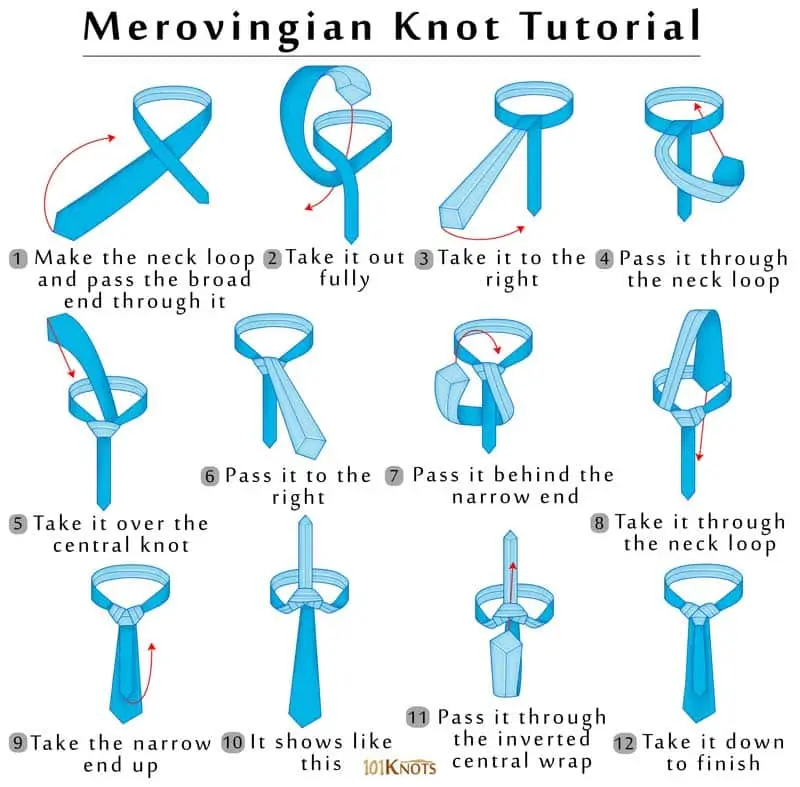
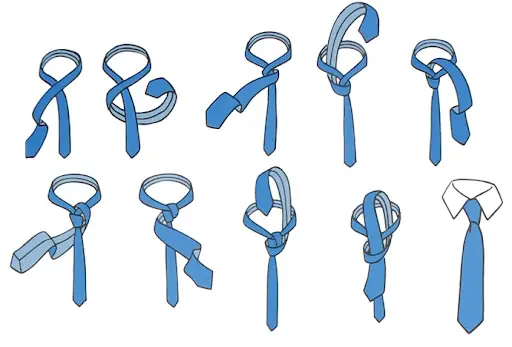
12. How to Tie the Merovingian Knot (Matrix Knot) – A Sci-Fi Inspired Statement Knot
Made popular by the movie The Matrix Reloaded, the Merovingian knot (also known as the Ediety knot) is bold, mysterious, and layered with style. It looks complex but is surprisingly manageable.
How to Tie It:
- Start with the tie inside out.
- Use the narrow end to form an initial small knot like a Four-in-Hand.
- Then bring the wide end over, under, and through to create the layered “banded” effect on top.
- Adjust and tighten for symmetry.
This is the ultimate tie knot for cosplay, red carpet events, or sci-fi fans looking to turn heads.
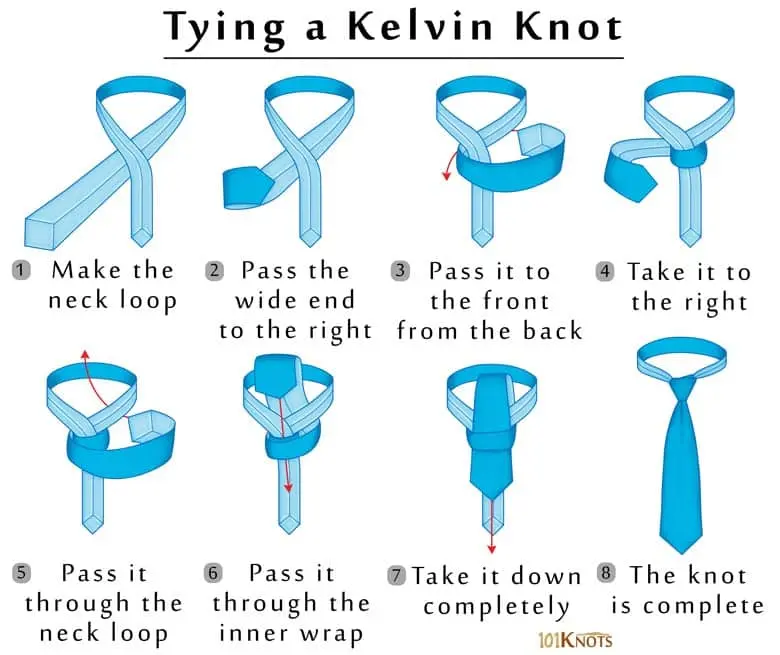
13. How to Tie the Kelvin Knot – A Tight and Angular Knot for Modern Looks
The Kelvin knot is like a more angular and tighter version of the Four-in-Hand. It creates a small, neat triangle and works well for shorter ties or thick fabrics.
Step-by-Step:
- Start with the tie inside out.
- Wrap the wide end around the narrow end twice.
- Bring it up through the neck loop.
- Tuck it through the final front loop and adjust.
Use the Kelvin when you need a necktie knot for narrow collars, short torsos, or minimalist menswear.
14. How to Tie the Cavendish Knot – A Balanced Business Knot
The Cavendish knot is essentially a double Four-in-Hand, offering more symmetry and bulk. It’s a great middle-ground between casual and formal, ideal for everyday office wear.
How to Tie It:
- Begin like the Four-in-Hand, but wrap the wide end around twice instead of once.
- Bring the tie up through the neck loop.
- Slide it into the front knot.
- Tighten and adjust into a compact, balanced triangle.
If you want a little extra structure without going full Windsor, the Cavendish is the best tie knot for business casual outfits.
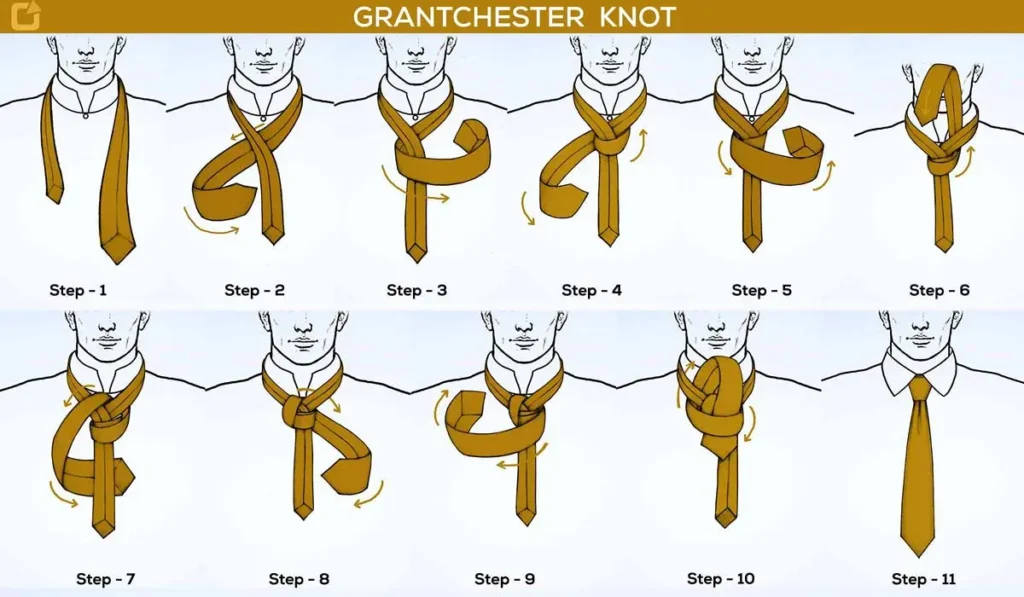
15. How to Tie the Grantchester Knot – A Thick Tie Knot for Wide Collars
The Grantchester knot is large and triangular, similar to the Windsor but with a softer edge. It works best with longer ties and wide spread collars.
How to Tie It:
- Start with the wide end on your right, longer than usual.
- Wrap it around the narrow end four times, alternating directions.
- Bring it up through the neck loop.
- Tuck it into the front knot and shape carefully.
This knot is ideal for formal dress shirts, weddings, or any time you want a bold, confident knot with a classic finish.
Why Learning Different Necktie Knots Matters – And When to Use Them
Knowing how to tie a necktie is more than just a functional skill—it’s a powerful form of self-expression. Each knot sends a different message. Some are sleek and professional, others bold and artistic. Mastering a variety of tie knots means you can adapt your look to any event, mood, or outfit with precision and confidence.
Here’s why it pays to learn more than just the basic knot:
1. Match the Knot to the Occasion
- A Four-in-Hand knot might be perfect for everyday office wear, but a Full Windsor brings extra polish to a formal interview.
- Attending a wedding or black-tie event? A Trinity or Eldredge knot adds creative flair that fits celebratory, upscale vibes.
- Need something ultra-modern and unexpected? The Atlantic or Merovingian knot makes a bold statement at themed events, galas, or fashion-forward settings.
2. Suit Your Shirt and Collar Type
Some knots simply look better depending on the shirt you’re wearing:
- Wide spread collars pair well with bigger knots like the Full Windsor or Grantchester.
- Narrow collars work best with compact knots like the Kelvin, Four-in-Hand, or Oriental.
- A perfectly paired knot brings balance and structure to your overall look—especially in professional settings.
3. Enhance Your Personal Style
Your tie knot can become your signature.
- Prefer clean, no-fuss outfits? Stick with minimalist knots like the Pratt or Kelvin.
- Like standing out in a crowd? Add knots like the Eldredge, Fishbone, or Balthus to your arsenal.
- Want to blend tradition and modern flair? The Trinity strikes a perfect balance.
4. Impress with Detail and Intention
Wearing a thoughtfully chosen knot shows attention to detail. It tells people you didn’t just throw something on—you curated your look. That kind of subtle, intentional elegance leaves a lasting impression, whether you’re at a date, business pitch, wedding, or networking event.
Conclusion: Master the Art of Necktie Knots and Elevate Your Style
Learning how to tie a tie in different ways isn’t just about memorizing steps—it’s about owning your style, making the right impression, and showing up with intention. Whether you’re dressing for a boardroom, a ballroom, or a best friend’s wedding, the knot you choose can set the tone before you even speak.
From the simplicity of the Four-in-Hand knot for everyday wear to the intricate elegance of the Eldredge or Trinity knot for formal events, each technique gives you the power to adapt your look to any situation.
With this guide, you’re not just learning how to tie a necktie—you’re building a toolkit of style for every chapter of life.
So take a few minutes to practice. Try something new. Get comfortable with your go-to knots and experiment with a few you’ve never heard of. Before long, you won’t just be wearing a tie—you’ll be making it part of your signature look.
Because in the end, it’s not just about the knot.
It’s about how you wear it.